Stock Your Pantry: Home-Canned Green Beans the Homestead Way
There's a special kind of satisfaction that comes from looking at a pantry shelf filled with jars of homegrown, hand-preserved food. Among the most cherished staples for any homesteader or aspiring self-sufficient household are home-canned green beans. This classic skill not only provides delicious, ready-to-eat vegetables all year round but also deeply connects us to generations past who relied on such preservation methods. If you've ever wondered
how to can green beans safely and effectively, you've come to the right place. We'll guide you through the process, transforming your fresh harvest into a pantry full of wholesome goodness.
Once you experience the superior taste and texture of home-canned green beans, it’s truly hard to go back to store-bought varieties. They retain more of their garden-fresh flavor, a pleasant firmness, and best of all, you know precisely what’s in each jar – no obscure additives or preservatives. Whether you're a seasoned canner seeking a refresher or a complete beginner ready to embrace this rewarding skill, canning green beans is a straightforward process that yields incredibly satisfying results.
From Garden to Jar: Selecting and Prepping Your Green Beans
The journey to delicious home-canned green beans begins with the right produce. While any tender, fresh green bean can be canned, understanding a few nuances can elevate your experience.
Choosing the Best Beans for Canning
When selecting beans, look for those that are young, tender, and snap cleanly when bent. Avoid any beans that are tough, stringy, or bulging with mature seeds, as these won't soften adequately during canning and can result in a less pleasant texture.
*
Pole Beans vs. Bush Beans: Many homesteaders prefer pole beans, like the popular Emerite or Purple Podded Pole Beans (which famously turn green when cooked or canned!). Pole beans tend to produce over a longer season and require less bending for harvest, making them a practical choice for larger gardens. Bush beans, while maturing faster, often have a more concentrated harvest window.
*
Quantity: Plan for approximately 1 pound of fresh beans per pint jar, or about 1 ½ pounds for each quart jar you intend to can.
Washing and Preparing Your Harvest
Proper preparation is key to both safety and quality.
1.
Wash Thoroughly: Rinse your beans under cool, running water. It's often surprising how much garden grime and dust washes off, even from seemingly clean beans. Drain them well afterwards.
2.
Trim and Snap/Cut: Trim off both ends of each bean. You can then leave them whole for a "French-style" presentation or cut/snap them into 1- to 2-inch pieces. Snapping by hand can often be easier for detecting any overly tough or seedy beans that should be discarded.
Raw Pack vs. Hot Pack: Demystifying Your Canning Options
When it comes to packing your prepared green beans into jars, you have two primary methods: raw pack and hot pack. Both are safe and approved for pressure canning, and the processing times remain the same for both. Your choice often comes down to personal preference and efficiency.
*
Raw Pack: This method involves packing fresh, unprepared beans directly into room-temperature jars. You then cover them with boiling water or hot broth. It's generally quicker and requires less handling of hot food, making it ideal when processing a large harvest. A common characteristic is that beans may shrink a bit more in the jar, and liquid levels might drop slightly during processing (though this doesn't affect safety if the seal is good).
*
Hot Pack: For this method, beans are blanched or pre-cooked in boiling water for about 5 minutes before being packed hot into warm jars. This technique can help the beans retain their color and texture a little better in storage, and often results in less liquid loss in the jars. However, it does add an extra step of cooking and handling hot beans and liquid.
Many home canners, ourselves included, lean towards the raw pack method for its simplicity and speed, especially when dealing with a mountain of fresh beans. However, both methods are equally safe and produce excellent results. For a deeper dive into these techniques and to decide which is best for your canning needs, explore our detailed guide:
Raw Pack vs. Hot Pack: The Easiest Way to Can Green Beans.
Essential Equipment for Safe Home Canning
Before you begin, gathering all your canning equipment is crucial. Canning is a process that benefits from efficiency, and having everything at your fingertips will make for a smoother, safer experience.
You will need:
*
Fresh, Tender Green Beans: As discussed above.
*
Canning Salt (Optional): Use ½ teaspoon per pint or 1 teaspoon per quart. *Crucially, do NOT use iodized table salt*, as it can cause discoloration and cloudiness in your beans. Canning salt is pure salt designed for preservation.
*
Canning Jars with Two-Piece Lids: Use standard Mason-style canning jars (pint or quart). Ensure they are clean and free of chips or cracks. Keep them warm (in hot water or a low oven) to prevent thermal shock when adding hot liquid.
*
Pressure Canner: This is non-negotiable for green beans! Green beans are a low-acid food, meaning they *must* be processed in a pressure canner to reach temperatures high enough to destroy harmful bacteria like *Clostridium botulinum*. A water bath canner is NOT safe for green beans.
*
Jar Lifter: Essential for safely placing and removing hot jars from the canner.
*
Ladle: For adding hot water or broth to the jars.
*
Tongs or Magnetic Lid Lifter: For handling the flat canning lids, which should be kept warm in hot (not boiling) water to soften the sealing compound.
*
Hot Pads or Oven Mitts: For handling hot jars, lids, and canner parts.
*
Small Dishcloths or Paper Towels: For wiping jar rims clean.
*
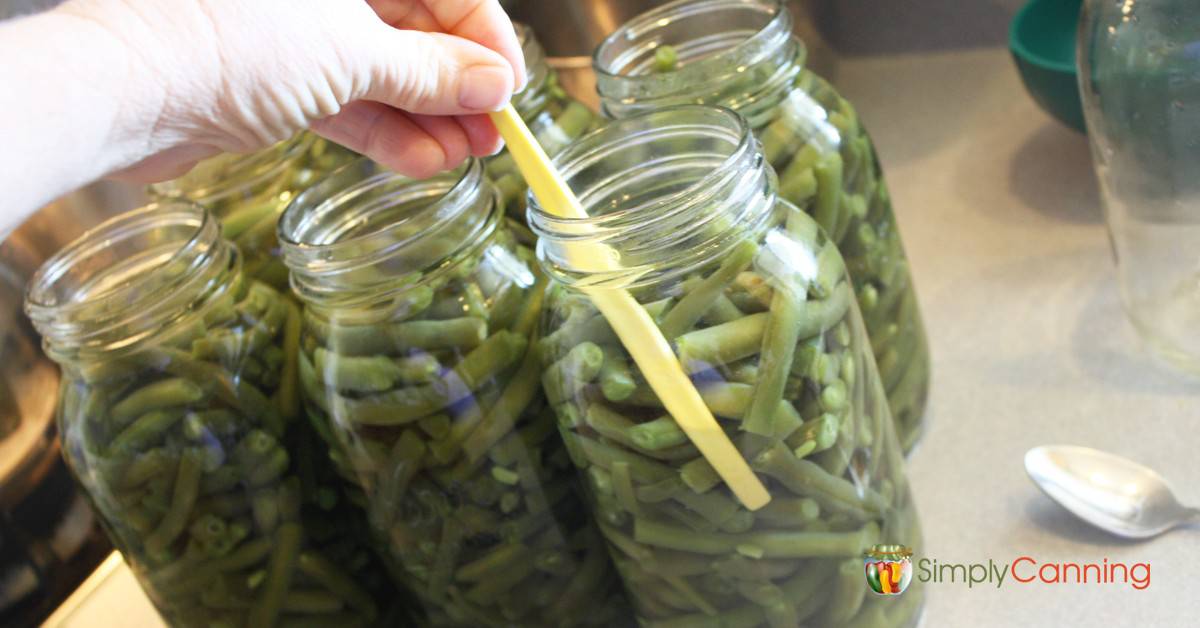
Debubbler Tool (or Chopstick/Thin Spatula): To remove trapped air bubbles from packed jars.
*
Large Stockpot: For blanching if hot packing, or for heating water to fill jars.
Step-by-Step: How to Can Green Beans the Homestead Way
With your beans prepped and equipment ready, it's time for the main event! Follow these steps carefully to ensure a safe and successful batch of home-canned green beans.
1. Prepare Your Jars and Lids
Ensure your canning jars are sparkling clean. Keep them warm – either by running them through a dishwasher cycle, submerging them in hot water, or placing them in a low oven (around 170°F). Place new flat lids in a small saucepan of hot (not boiling) water to soften the sealing compound. Rings can be kept nearby.
2. Pack the Beans (Raw or Hot)
*
Raw Pack: Tightly pack the prepared green beans into the warm jars, leaving 1 inch of headspace (the space between the food and the rim of the jar).
*
Hot Pack: If hot packing, blanch your prepared beans for 5 minutes in boiling water. Then, using tongs, hot-pack them into warm jars, leaving 1 inch of headspace.
3. Add Salt and Liquid
If using, add ½ teaspoon of canning salt to pint jars or 1 teaspoon to quart jars. Then, ladle boiling water (for raw pack) or the hot blanching liquid/fresh boiling water (for hot pack) over the beans, maintaining the 1-inch headspace.
4. Remove Air Bubbles
Using your debubbler tool, chopstick, or a thin plastic spatula, gently slide it down the sides of the jar to release any trapped air bubbles. Add more hot liquid if necessary to restore the 1-inch headspace.
5. Wipe Rims and Apply Lids
Carefully wipe the rims of each jar with a clean, damp cloth. Any food residue on the rim can prevent a proper seal. Center a warm, moist flat lid on each jar, then screw on a canning ring "finger-tight" – snug but not overly tight.
6. Process in the Pressure Canner
Place the filled, sealed jars into your pressure canner. Add the amount of water specified by your canner's manufacturer (usually 2-3 inches). Lock the canner lid in place.
*
Venting: Turn the heat to high and allow steam to escape steadily from the vent pipe for 10 minutes (this ensures all air is removed from the canner, preventing inaccurate pressure readings).
*
Pressurizing: Place the weighted gauge or close the petcock. Allow the canner to come up to the recommended pressure for your altitude and canner type (typically 10-11 pounds for most dial gauges at sea level, or 10 pounds for weighted gauges).
*
Processing: Once the target pressure is reached, begin your processing time. For both pint and quart jars of green beans, process for 20 minutes. *Do not start timing until the correct pressure is reached and stable.* Adjust heat as necessary to maintain consistent pressure throughout the entire 20 minutes. For more detailed instructions on safe pressure canning practices, refer to:
Mastering Home-Canned Green Beans: A Safe Step-by-Step Guide.
7. Cooling and Storage
Once processing is complete, turn off the heat and allow the canner to cool naturally until the pressure gauge reads zero. Do not rush this process by opening the vent or cooling with water, as this can cause siphoning and seal failures. Once depressurized, remove the lid carefully, lifting it away from your face to avoid steam.
Using your jar lifter, carefully remove the hot jars and place them on a towel-lined surface, away from drafts. Allow them to cool undisturbed for 12-24 hours. As they cool, you'll start to hear the satisfying "ping" sound as the lids seal.
After 24 hours, check for proper seals. Press on the center of each lid; if it doesn't flex, it's sealed. Remove the rings, wipe the jars clean, label them with the contents and date, and store them in a cool, dark place. Any unsealed jars should be refrigerated and consumed within a few days.
Enjoying Your Bountiful Pantry
Canning green beans is more than just a chore; it's an investment in your family's food security and a celebration of the harvest. Each time you reach for a jar of your home-canned green beans, you'll be reminded of your efforts and the delicious, wholesome food you've preserved. They’re perfect for side dishes, added to soups, stews, or casseroles, bringing that taste of summer freshness to your table all year long. Embrace this rewarding homestead skill, and enjoy the fruits (or rather, the beans!) of your labor.